VSCode下 C/C++插件是微软自己开发的,根据VSCode扩展商店政策,第三方Fork的VSCode项目是不允许使用的。
Trae下如果打开C/C++项目,默认会推荐安装ccls插件来支持。
Mac下使用还需要一点小改动。
首先通过brew安装ccls命令行
brew install ccls自动安装ccls和它的依赖比如llvm
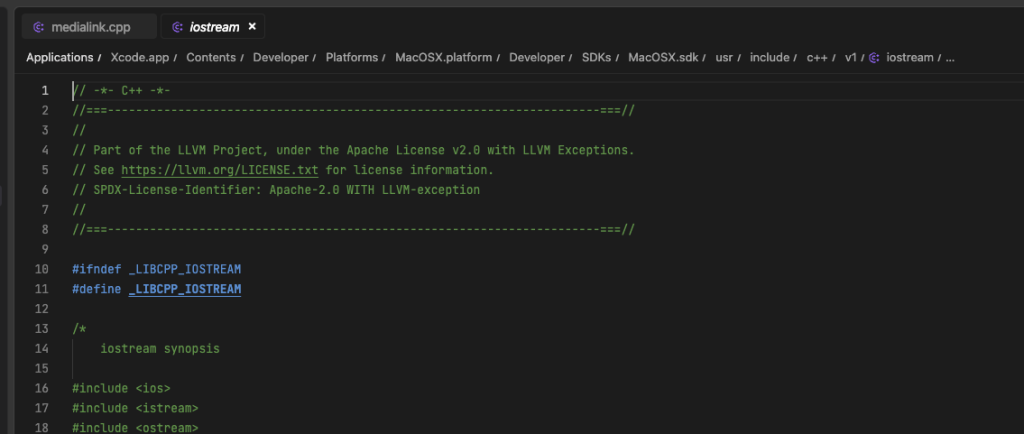
再次通过Trae打开项目,发现仍然找不到标准头文件。

打开终端,输入命令
clang++ -xc++ -fsyntax-only -v /dev/null打印:
InstalledDir: /Applications/Xcode.app/Contents/Developer/Toolchains/XcodeDefault.xctoolchain/usr/bin
ignoring nonexistent directory "/Applications/Xcode.app/Contents/Developer/Toolchains/XcodeDefault.xctoolchain/usr/bin/../include/c++/v1"
 "/Applications/Xcode.app/Contents/Developer/Toolchains/XcodeDefault.xctoolchain/usr/bin/clang" -cc1 -triple arm64-apple-macosx15.0.0 -Wundef-prefix=TARGET_OS_ -Wdeprecated-objc-isa-usage -Werror=deprecated-objc-isa-usage -Werror=implicit-function-declaration -fsyntax-only -disable-free -clear-ast-before-backend -disable-llvm-verifier -discard-value-names -main-file-name null -mrelocation-model pic -pic-level 2 -mframe-pointer=non-leaf -fno-strict-return -ffp-contract=on -fno-rounding-math -funwind-tables=1 -fobjc-msgsend-selector-stubs -target-sdk-version=15.4 -fvisibility-inlines-hidden-static-local-var -fdefine-target-os-macros -fno-assume-unique-vtables -fno-modulemap-allow-subdirectory-search -target-cpu apple-m1 -target-feature +zcm -target-feature +zcz -target-feature +v8.5a -target-feature +aes -target-feature +altnzcv -target-feature +ccdp -target-feature +complxnum -target-feature +crc -target-feature +dotprod -target-feature +fp-armv8 -target-feature +fp16fml -target-feature +fptoint -target-feature +fullfp16 -target-feature +jsconv -target-feature +lse -target-feature +neon -target-feature +pauth -target-feature +perfmon -target-feature +predres -target-feature +ras -target-feature +rcpc -target-feature +rdm -target-feature +sb -target-feature +sha2 -target-feature +sha3 -target-feature +specrestrict -target-feature +ssbs -target-abi darwinpcs -debugger-tuning=lldb -fdebug-compilation-dir=/Users/aliang -target-linker-version 1167.4.1 -v -fcoverage-compilation-dir=/Users/aliang -resource-dir /Applications/Xcode.app/Contents/Developer/Toolchains/XcodeDefault.xctoolchain/usr/lib/clang/17 -isysroot /Applications/Xcode.app/Contents/Developer/Platforms/MacOSX.platform/Developer/SDKs/MacOSX.sdk -I/usr/local/include -internal-isystem /Applications/Xcode.app/Contents/Developer/Platforms/MacOSX.platform/Developer/SDKs/MacOSX.sdk/usr/include/c++/v1 -internal-isystem /Applications/Xcode.app/Contents/Developer/Platforms/MacOSX.platform/Developer/SDKs/MacOSX.sdk/usr/local/include -internal-isystem /Applications/Xcode.app/Contents/Developer/Toolchains/XcodeDefault.xctoolchain/usr/lib/clang/17/include -internal-externc-isystem /Applications/Xcode.app/Contents/Developer/Platforms/MacOSX.platform/Developer/SDKs/MacOSX.sdk/usr/include -internal-externc-isystem /Applications/Xcode.app/Contents/Developer/Toolchains/XcodeDefault.xctoolchain/usr/include -Wno-reorder-init-list -Wno-implicit-int-float-conversion -Wno-c99-designator -Wno-final-dtor-non-final-class -Wno-extra-semi-stmt -Wno-misleading-indentation -Wno-quoted-include-in-framework-header -Wno-implicit-fallthrough -Wno-enum-enum-conversion -Wno-enum-float-conversion -Wno-elaborated-enum-base -Wno-reserved-identifier -Wno-gnu-folding-constant -fdeprecated-macro -ferror-limit 19 -stack-protector 1 -fstack-check -mdarwin-stkchk-strong-link -fblocks -fencode-extended-block-signature -fregister-global-dtors-with-atexit -fgnuc-version=4.2.1 -fno-cxx-modules -fskip-odr-check-in-gmf -fcxx-exceptions -fexceptions -fmax-type-align=16 -fcommon -fcolor-diagnostics -clang-vendor-feature=+disableNonDependentMemberExprInCurrentInstantiation -fno-odr-hash-protocols -clang-vendor-feature=+enableAggressiveVLAFolding -clang-vendor-feature=+revert09abecef7bbf -clang-vendor-feature=+thisNoAlignAttr -clang-vendor-feature=+thisNoNullAttr -clang-vendor-feature=+disableAtImportPrivateFrameworkInImplementationError -D__GCC_HAVE_DWARF2_CFI_ASM=1 -x c++ /dev/null
clang -cc1 version 17.0.0 (clang-1700.0.13.3) default target arm64-apple-darwin24.4.0
ignoring nonexistent directory "/Applications/Xcode.app/Contents/Developer/Platforms/MacOSX.platform/Developer/SDKs/MacOSX.sdk/usr/local/include"
ignoring nonexistent directory "/Applications/Xcode.app/Contents/Developer/Platforms/MacOSX.platform/Developer/SDKs/MacOSX.sdk/System/Library/SubFrameworks"
ignoring nonexistent directory "/Applications/Xcode.app/Contents/Developer/Platforms/MacOSX.platform/Developer/SDKs/MacOSX.sdk/Library/Frameworks"
#include "..." search starts here:
#include <...> search starts here:
 /usr/local/include
 /Applications/Xcode.app/Contents/Developer/Platforms/MacOSX.platform/Developer/SDKs/MacOSX.sdk/usr/include/c++/v1
 /Applications/Xcode.app/Contents/Developer/Toolchains/XcodeDefault.xctoolchain/usr/lib/clang/17/include
 /Applications/Xcode.app/Contents/Developer/Platforms/MacOSX.platform/Developer/SDKs/MacOSX.sdk/usr/include
 /Applications/Xcode.app/Contents/Developer/Toolchains/XcodeDefault.xctoolchain/usr/include
 /Applications/Xcode.app/Contents/Developer/Platforms/MacOSX.platform/Developer/SDKs/MacOSX.sdk/System/Library/Frameworks (framework directory)
End of search list.
打开Trae,切换到扩展,点ccls的配置,点ccls.clang.extraArgs

根据前一个打印,修改这个值为:
  "ccls.clang.extraArgs": [
    "-isystem/usr/local/include",
    "-isystem/Applications/Xcode.app/Contents/Developer/Platforms/MacOSX.platform/Developer/SDKs/MacOSX.sdk/usr/include/c++/v1",
    "-isystem/Applications/Xcode.app/Contents/Developer/Toolchains/XcodeDefault.xctoolchain/usr/lib/clang/17/include",
    "-isystem/Applications/Xcode.app/Contents/Developer/Platforms/MacOSX.platform/Developer/SDKs/MacOSX.sdk/usr/include",
    "-isystem/Applications/Xcode.app/Contents/Developer/Toolchains/XcodeDefault.xctoolchain/usr/include",
    "-isystem/Applications/Xcode.app/Contents/Developer/Platforms/MacOSX.platform/Developer/SDKs/MacOSX.sdk/System/Library/Frameworks"
  ],
重启Trae后,再点头文件,正常跳转
原创文章,转载请注明: 转载自贝壳博客
本文链接地址: 解决Trae在MacOS下开发C/C++的问题